import algolab
import sys
#sys.path.append('../exams/2017-01-26-lab/solutions')
sys.path.append('past-exams/2017-01-26/solutions')
algolab.init()
Scientific Programming Module 2
Algorithms and Data Structures
Thusday 26th, Jan 2017
Introduction
- Taking part to this exam erases any vote you had before, both lab and theory
- If you don't ship or you don't pass this lab part, you lose also the theory part.
- Log into your computer in exam mode, it should start Ubuntu
- To edit the files, you can use any editor of your choice: Editra seems easy to use, you can find it under Applications->Programming->Editra. Others could be GEdit (simpler), or PyCharm (more complex).
Allowed material
There won't be any internet access. You will only be able to access:
- Sciprog Algolab worksheets
- Alberto Montresor slides
- Stefano Teso docs
- Python 2.7 documentation : html
pdf
- In particular, Unittest docs
- The course book Problem Solving with Algorithms and Data Structures using Python html pdf
Grading
- The grade of this lab part will range from 0 to 30. Total grade for the module will be given by the average with the theory part of Alberto Montresor.
- Correct implementations with the required complexity grant you full grade.
- Partial implementations might still give you a few points. If you just can't solve an exercise, try to solve it at least for some subcase (i.e. array of fixed size 2) commenting why you did so.
One bonus point can be earned by writing stylish code. You got style if you:
- do not infringe the Commandments
- write pythonic code
avoid convoluted code like i.e.
  if x > 5:
      return True
  else:
      return False
when you could write just
return x > 5
%%HTML

<p class="algolab-warn">

!!!!!!!!! WARNING !!!!!!!!!

    <br/>
    <br/>
!!!!!!!!!  **ONLY** IMPLEMENTATIONS OF THE PROVIDED FUNCTION SIGNATURES WILL BE EVALUATED !!!!!!!!! <br/>

</p>
For example, if you are given to implement:
def cool_fun(x):
        raise Exception("TODO implement me")
and you ship this code:
def cool_fun_non_working_trial(x):
    # do some absurdity

def cool_fun_a_perfectly_working_trial(x):
    # a super fast, correct and stylish implementation

def cool_fun(x):
    raise Exception("TODO implement me")
We will assess only the latter one cool_fun(x), and conclude it doesn't work at all :P !!!!!!!
Still, you are allowed to define any extra helper function you might need. If your cool_fun(x) implementation calls some other function you defined like my_helper here, it is ok:
def my_helper(y,z):
    # do something useful

def cool_fun(x):
    my_helper(x,5)

# this will get ignored:
def some_trial(x):
    # do some absurdity
What to do
In /usr/local/esame you should find a file named algolab-17-01-26.zip. Download it and extract it on your desktop. The content should be like this:
algolab-17-01-26
    |- FIRSTNAME-LASTNAME-ID
        |- exercise1.py
        |- exercise2.py
        |- exercise3.py
2) Check this folder also shows under /var/exam.
3) Rename FIRSTNAME-LASTNAME-ID folder: put your name, lastname an id number, like john-doe-432432
From now on, you will be editing the files in that folder. At the end of the exam, that is what will be evaluated.
4) Edit the files following the instructions in this worksheet for each exercise.
%%HTML

<p class="algolab-warn">
WARNING: <i>DON'T</i> modify function signatures! Just provide the implementation.
</p>

<p class="algolab-warn">
WARNING: <i>DON'T</i> change the existing test methods, just add new ones !!!  You can add as many as you want.
</p>

<p class="algolab-warn">
WARNING: <i>DON'T</i> create other files. If you still do it, they won't be evaluated.
</p>

<p class="algolab-important">
IMPORTANT: Pay close attention to the comments of the functions.
</p>

<p class="algolab-important">
IMPORTANT: if you need to print some debugging information, you <i>are allowed</i> to put extra <code>print</code>
    statements in the function bodies.
</p>

<p class="algolab-warn">
WARNING: even if <code>print</code> statements are allowed, be careful with prints that might
     break your function, i.e. avoid stuff like this: <code> print 1/0 </code>
</p>
3) Every exercise should take max 25 mins. If it takes longer, leave it and try another exercise.
%%HTML

<p class="algolab-warn">
WARNING: MAKE SURE ALL EXERCISE FILES AT LEAST COMPILE !!! <br/> 10 MINS BEFORE THE END
    OF THE EXAM I WILL ASK YOU TO DO A FINAL CLEAN UP OF THE CODE
</p>
Exercises
1) SwapArray
You are given a class SwapArray that models an array where the only modification you can do is to swap an element with the successive one.
from exercise1_solution import *
To create a SwapArray, just call it passing a python list:
sarr = SwapArray([7,8,6])
print sarr
Then you can query in $O(1)$ it by calling get() and get_last()
print sarr.get(0)
print sarr.get(1)
print sarr.get_last()
You can know the size in $O(1)$ with size() method:
print sarr.size()
As we said, the only modification you can do to the internal array is to call swap_next method:
def swap_next(self, i):
""" Swaps the elements at indeces i and i + 1

            If index is negative or greater or equal of the last index, raises
            an IndexError

        """
For example:
sarr = SwapArray([7,8,6,3])
print sarr
sarr.swap_next(2)
print sarr
sarr.swap_next(0)
print sarr
Now start editing the file exercise1.py:
1.0) test swap
To check your environment is working fine, try to run the tests for the sole swap method. You don't need to implement it, the tests are in SwapTest class and should all pass:
Notice that exercise1 is followed by a dot and test class name: .SwapTest
python -m unittest exercise1.SwapTest
1.1) is_sorted
Implement the is_sorted function, which is a function external to the class SwapArray:
def is_sorted(sarr):
    """ Returns True if the provided SwapArray sarr is sorted, False otherwise

        NOTE: Here you are a user of SwapArray, so you *MUST NOT* access
              directly the field _arr.
    """
    raise Exception("TODO IMPLEMENT ME !")
Once done, running this will run only the tests in IsSortedTest class and hopefully they will pass.
Notice that exercise1 is followed by a dot and test class name: .IsSortedTest
python -m unittest exercise1.IsSortedTest
Example usage:
print is_sorted(SwapArray([8,5,6]))
print is_sorted(SwapArray([5,6,6,8]))
1.2) max_to_right
Implement max_to_right function, which is a function external to the class SwapArray. There are two ways to implement it, try to minimize the reads from the SwapArray.
def max_to_right(sarr):
    """ Modifies the provided SwapArray sarr so that its biggest element is
        moved to the last index. The order in which the other elements will be
        after a call to this function is left unspecified (so it could be any).

        NOTE: Here you are a user of SwapArray, so you *MUST NOT* access
              directly the field _arr. To do changes, you can only use
              the method swap(self, i).
    """
    raise Exception("TODO IMPLEMENT ME !")
Testing : python -m unittest exercise1.MaxToRightTest
Example usage:
sarr = SwapArray([8, 7, 6])
print sarr
max_to_right(sarr)
print sarr
sarr = SwapArray([6,8,6])
print sarr
max_to_right(sarr)
print sarr
2) DiGraph
Now you are going to build some DiGraph, by defining functions external to class DiGraph.
%%HTML

<p class="algolab-warn" target="_blank">
WARNING: To build the graphs, just use the methods you find inside <code>DiGraph</code> class, like <code>add_vertex</code>,
    <code>add_edge</code>, etc.
</p>
Start editing file exercise2.py
from exercise2_solution import *
2.1) odd_line
Implement the function odd_line. Note the function is defined outside DiGraph class.
def odd_line(n):
    """ Returns a DiGraph with n verteces, displaced like a line of odd numbers

        Each vertex is an odd number i, for  1 <= i < 2n. For example, for
        n=4 verteces are displaced like this:

        1 -> 3 -> 5 -> 7

        For n = 0, return the empty graph

    """
    raise Exception("TODO IMPLEMENT ME !")
Testing: python -m unittest exercise2.OddLineTest
Example usage :
print odd_line(0)
print odd_line(1)
print odd_line(2)
print odd_line(3)
print odd_line(4)
2.2) even_line
Implement the function even_line. Note the function is defined outside DiGraph class.
def even_line(n):
    """ Returns a DiGraph with n verteces, displaced like a line of even numbers

        Each vertex is an even number i, for  2 <= i <= 2n. For example, for
        n=4 verteces are displaced like this:

        2 <- 4 <- 6 <- 8

        For n = 0, return the empty graph

    """

    raise Exception("TODO IMPLEMENT ME !")
Testing: python -m unittest exercise2.EvenLineTest
Example usage:
print even_line(0)
print even_line(1)
print even_line(2)
print even_line(3)
print even_line(4)
2.3) quads
Implement the quads function. Note the function is defined outside DiGraph class.
def quads(n):
    """ Returns a DiGraph with 2n verteces, displaced like a strip of quads.

        Each vertex is a number i,  1 <= i <= 2n.
        For example, for n = 4, verteces are displaced like this:

        1 -> 3 -> 5 -> 7
        ^    |    ^    |
        |    ;    |    ;
        2 <- 4 <- 6 <- 8

        where

          ^                                         |
          |  represents an upward arrow,   while    ;  represents a downward arrow

    """
    raise Exception("TODO IMPLEMENT ME !")
Testing: python -m unittest exercise2.QuadsTest
Example usage:
print quads(0)
print quads(1)
print quads(2)
print quads(3)
print quads(4)
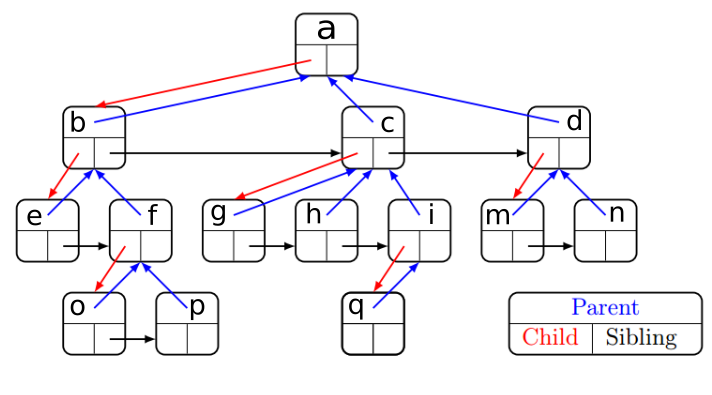
3) GenericTree
In this exercise you will deal with family matters, using the GenericTree we saw during labs:
Now start editing the file exercise3.py:
3.1) grandchildren
Implement the grandchildren method:
def grandchildren(self):
        """ Returns a python list containing the data of all the grandchildren of this
            node.

            - Data must be from left to right order in the tree horizontal representation
              (or up to down in the vertical representation).
            - If there are no grandchildren, returns an empty array.

            For example, for this tree:

            a
            |-b
            | |-c
            | \-d
            |   \-g
            |-e
            \-f
              \-h

            Returns ['c','d','h']
        """
        raise Exception("TODO IMPLEMENT ME !")
Testing: python -m unittest exercise3.GrandChildrenTest
Usage examples:
from exercise3_solution import *
ta = gt('a', gt('b', gt('c')))
print ta
print ta.grandchildren()
ta = gt('a', gt('b'))
print ta
print ta.grandchildren()
ta = gt('a', gt('b', gt('c'), gt('d')), gt('e', gt('f')) )
print ta
print ta.grandchildren()
3.2) uncles
Implement the uncles method:
def uncles(self):
        """ Returns a python list containing the data of all the uncles of this
            node (that is, *all* the siblings of its parent).

            NOTE: returns also the father siblings which are *BEFORE* the father !!

            - Data must be from left to right order in the tree horizontal representation
              (or up to down in the vertical representation).
            - If there are no uncles, returns an empty array.

            For example, for this tree:

            a
            |-b
            | |-c
            | \-d
            |   \-g
            |-e
              \-h
            \-f


            calling this method on 'h' returns ['b','f']
        """
Testing: python -m unittest exercise3.UnclesTest
Example usages:
td = gt('d')
tb = gt('b')
ta = gt('a', tb,  gt('c', td), gt('e'))
print ta
print td.uncles()
print tb.uncles()