Installation
We will see whether and how to install Python, additional Python libraries, Jupyter notebook and finally how to manage virtual environments.
Sometimes you don’t even need to install!
If you want, you can also directly program online with the following services
NOTE 1: if you want to try one, always remember to check it is using Python 3 !
NOTE 2: As for any online service, whenever it is freely offered do not abuse it. If you try processing a terabyte of data per day without paying a subscription, you risk a denial of service.
Python 3 on repl.it: allows to edit Python code collaboratively with other users, and also supports libraries such as Matplotlib
Python Tutor: allows to execute one instruction at a time while offering a very useful visualization of what is happening ‘under the hood’
Google Colab: allows editing collaboratively Jupyter notebooks and save them to Google Drive.
NOTE 1: it might be you won’t be able to access with university accounts (i.e.``@studenti.unitn.it``). In that case, use personal accounts such as
@gmail.comNOTE 2: the ‘collaborative’ aspect of Colab changed over time, be very careful at what happens when working in two people over the same document. Once (2017) changes performed by one were immediately seen by other users, but lately (2019) they seem only visibly when saving - even worse, they overwrite changes others could have done in the meanwhile.
Online Jupyter demo: sometimes it works but it is not always available. If you manage to access, remember to select from the menu Kernel->Change kernel->Python 3
Installing Python
There are varioues ways to install Python 3 and its modules: there is the official ‘plain’ Python distribution but also package managers (i.e. Anaconda) or preset environments (i.e. Python(x,y)) which give you Python plus many packages. Once completed the installation, Python 3 contains a command pip (sometimes called pip3 in Python 3), which allows to install afterwards other packages you may need.
The best way to choose what to install depends upon which operating system you have and what you intend to do with it. In this book we will use Python 3 and scientific packages, so we will try to create an environment to support this scenario.
Attention: before installing random stuff from the internet, read carefully this guide
We tried to make it generic enough, but we couldn’t test all various cases so problems may arise depending on your particular configuration.
Attention: do not mix different Python distribution for the same version !
Given the wide variety of installation methods and the fact Python is available in already many programs, it might be you already have installed Python without even knowing it, maybe in version 2, but we need the 3! Overlaying several Python environments with the same version may cause problems, so in case of doubt ask somebody who knows more!
Windows installation
For Windows, we suggest to install the distribution Anaconda for Python 3.8 or greater, which, along with the native Python package manager pip, also offers the more generic command line package manager conda.
Once installed, verify it is working like this:
click on the Windows icon in the lower left corner and search for ‘Anaconda Prompt’. It should appear a console where to insert commands, with written something like
C:\Users\David>. NOTE: to launch Anaconda commands, only use this special console. If you use the default Windows console (cmd), Windows will not be able to find Python.In Anaconda console, type:
conda list
It should appear a list of installed packages, like
# packages in environment at C:\Users\Jane\AppData\Local\Continuum\Anaconda3:
#
alabaster                 0.7.7                    py35_0
anaconda                  4.0.0               np110py35_0
anaconda-client           1.4.0                    py35_0
...
numexpr                   2.5                 np110py35_0
numpy                     1.10.4                   py35_0
odo                       0.4.2                    py35_0
...
yaml                      0.1.6                         0
zeromq                    4.1.3                         0
zlib                      1.2.8                         0
Try Python3 by typing in the Anaconda console:
C:> python
It should appear something like:
Python 3.6.3 (default, Sep 14 2017, 22:51:06)
MSC v.1900 64 bit (Intel)[GCC 5.4.0 20160609] on win64
Type "help", "copyright", "credits" or "license" for more information.
>>>
Attention: with Anaconda, you must write python instead of python3 !
If you installed Anaconda for Python3, it will automatically use the correct Python version by simply writing python. If you write python3 you will receive an error of file not found !
Attention: if you have Anaconda, always use conda to install Python modules ! So if in next tutorials you se written pip3 install whatever, you will instead have to use conda install whatever
Mac installation
To best manage installed app on Mac independently from Python, usually it is convenient to install a so called package manager. There are various, and one of the most popular is Homebrew. So we suggest to first install Homebrew and then with it you can install Python 3, plus eventually other components you might need. As a reference, for installation we took and simplified this guide by Digital Ocean
Attention: check if you already have a package manager !
If you already have installed a package manager like for example Conda (in Anaconda distribution), Rudix, Nix, Pkgsrc, Fink, o MacPorts, maybe Homebrew is not needed and it’s better to use what you already have. In these cases, it may be worth asking somebody who knows more ! If you already have Conda/Anaconda, it can be ok as long as it is for Python 3.
— 1 Open the Terminal
MacOS terminal is an application you can use to access command line. As any other application, it’s available in Finder, navigation in Applications folder, and the in the folder Accessories. Frotm there, double click on the Terminal to open it as any other app. As an alternative, you can use Spotlight by pressing Command and Space to find the Terminal typing the name in the bar that appears.
— 2 Install Homebrew by executing in the terminal this command:
/usr/bin/ruby -e "$(curl -fsSL https://raw.githubusercontent.com/Homebrew/install/master/install)"
— 3 Add /usr/local/bin to PATH
In this passage with an unsettling name, once Homebrew installation is completed, you will make sure that apps installed with Homebrew shall always be used instead of those Mac OS X may automatically select.
— 3.1 Open a new Terminal.
— 3.2 From within the terminal, digit the command
ls -a
You will see the list of all files present in the home folder. In these files, verify if a file exists with the following name: .profile (note the dot at the beginning):
If it exists, go to following step
If it doesn’t exist, to create it type the following command:
touch $HOME/.profile
— 3.3 Open with text edit the just created file .profile giving the command:
open -e $HOME/.profile
— 3.4 In text edit, add to the end of the file the following line:
export PATH=/usr/local/bin:$PATH
— 3.5 Save and close both Text Edit and the Terminal
— 4 Verify Homebrew is correctly installed, by typing in a new Terminal:
brew doctor
If there aren’t updates to do, the Terminal should show:
Your system is ready to brew.
Otherwise, you might see a warning which suggest to execute another command like brew update to ensure the Homebrew installation is updated.
— 5. Install python3 (Remember the ‘3’ !):
brew install python3
Along with python 3, Homebrew will also install the internal package manager of Python pip3 which we will use in the following.
— 6 Verify Python3 is correctly installed. By executing this command the writing "/usr/local/bin/python3" should appear:
which python3
After this, try to launch
python3
You should see something similar:
Python 3.6.3 (default, Nov 17 2016, 17:05:23)
[GCC 5.4.0 20160609] on mac
Type "help", "copyright", "credits" or "license" for more information.
>>>
To exit Python, type exit() and press Enter.
Linux installation
Luckily, all Linux distributions are already shipped with package managers to easily install applications.
If you have Ubuntu:
follow the guide of Dive into Python 3, chapter 0 - Installare Python in particular by going to the subsection installing in Ubuntu Linux
after completing the guide, install also
python3-venv:sudo apt-get install python3-venv
If you don’t have Ubuntu, read this note and/or ask somebody who knows more.
To verify the installation, try to run from the terminal
python3
You should see something like this:
Python 3.6.3 (default, Nov 17 2016, 17:05:23)
[GCC 5.4.0 20160609] on linux
Type "help", "copyright", "credits" or "license" for more information.
>>>
Installing packages
You can extend Python by installing several free packages. The best way to do it varies according to the operating system and the installed package manager.
ATTENTION: We will be using system commands. If you see >>> in the command line, it means you are inside Python interpreter and you must first exit: to do it, type exit() and press Enter.
In what follows, to check if everything is working, you can substitute PACKAGENAME with requests which is a module for the web.
If you have Anaconda:
click on Windows icon in the lower left corner and search
Anaconda Prompt. A console should appear where to instert commands, with something written likeC:\Users\David>. (NOTE: to run commands in Anaconda, use only this special console. If you use the default Windows console (cmd), Windows, will not be able to find Python)In the console type
conda install PACKAGENAME
If you have Linux/Mac open the Terminaland give this command (--user install in your home):
python3 -m pip install --user PACKAGENAMENOTE: If you receive errors which tell you the command
python3is not found, remove the3afterpython
INFO: there is also a system command pip (or pip3 according to your system). You can directl call it with pip install --user PACKAGENAME
Instead, we install instead with commands like python3 -m pip install --user PACKAGENAME for uniformity and to be sure to install packages for Python 3 version
Jupyter Notebook
Run Jupyter notebook
A handy editor you can use for Python is Jupyter:
If you installed Anaconda, you should already find it in the system menu and also in the Anaconda Navigator.
If you didn’t install Anaconda, try searching in the system menu anyway, maybe by chance it was already installed
If you can’t find it in the system menu, you may anyway from command line
Try this:
jupyter notebook
or, as alternative,
python3 -m notebook
ATTENTION: jupyter is NOT a Python command, it is a system command.
If you see written >>> on command line it means you must first exit Python insterpreter by writing ‘exit()` and pressing Enter !
ATTENTION: If Jupyter is not installed you will see error messages, in this case don’t panic and go to installation.
A browser should automatically open with Jupyter, and in the console you should see messages like the following ones. In the browser you should see the files of the folders from which you ran Jupyter.
If no browser starts but you see a message like the one here, then copy the address you see in an internet browser, preferebly Chrome, Safari or Firefox.
$ jupyter notebook
[I 18:18:14.669 NotebookApp] Serving notebooks from local directory: /home/da/Da/prj/softpython/prj
[I 18:18:14.669 NotebookApp] 0 active kernels
[I 18:18:14.669 NotebookApp] The Jupyter Notebook is running at: http://localhost:8888/?token=49d4394bac446e291c6ddaf349c9dbffcd2cdc8c848eb888
[I 18:18:14.669 NotebookApp] Use Control-C to stop this server and shut down all kernels (twice to skip confirmation).
[C 18:18:14.670 NotebookApp]

    Copy/paste this URL into your browser when you connect for the first time,
    to login with a token:
        http://localhost:8888/?token=49d4394bac446e291c6ddaf349c9dbffcd2cdc8c848eb888
ATTENTION 1: in this case the address is http://localhost:8888/?token=49d4394bac446e291c6ddaf349c9dbffcd2cdc8c848eb888, but youts will surely be different!
ATTENTION 2: While Jupyter server is active, you can’t put commands in the terminal !
In the console you see the server output of Jupyter, which is active and in certain sense ‘it has taken control’ of the terminal. This means that if you write some commands inside the terminal, these will not be executed!
Saving Jupyter notebooks
You can save the current notebook in Jupyter by pressing Control-S while in the browser.
ATTENTION: DO NOT OPEN THE SAME DOCUMENT IN MANY TABS !!
Be careful to not open the same notebook in more the one tab, as modifications in different tabs may overwrite at random ! To avoid these awful situations, make sure to have only one tab per document. If you accidentally open the same notebook in different tabs, just close the additional tab.
Automated savings
Notebook changes are automatically saved every few minutes.
Turning off Jupyter server
Before closing Jupyter server, remember to save in the browser the notebooks you modified so far.
To correctly close Jupyter, do not brutally close the terminal, Instead, from the the terminal where you ran Jupyter, hit Control-c, a question should appear to which you should answer y (if you don’t answer in 5 seconds, you will have to hit control-c again).
Shutdown this notebook server (y/[n])? y
[C 11:05:03.062 NotebookApp] Shutdown confirmed
[I 11:05:03.064 NotebookApp] Shutting down kernels
Navigating notebooks
(Optional) To improve navigation experience in Jupyter notebooks, you may want to install some Jupyter extension, like toc2 which shows paragraph headers in the sidebar. To install:
Install the Jupyter contrib extensions:
1a. If you have Anaconda: Open Anaconda Prompt (or Terminal if on Max/Linux), and type:
conda install -c conda-forge jupyter_contrib_nbextensions
1b. If you don’t have Anaconda: Open the terminal and type:
python3 -m pip install --user jupyter_contrib_nbextensions
2. Install in Jupyter:
jupyter contrib nbextension install --user
3. Enable extensions:
jupyter nbextension enable toc2/main
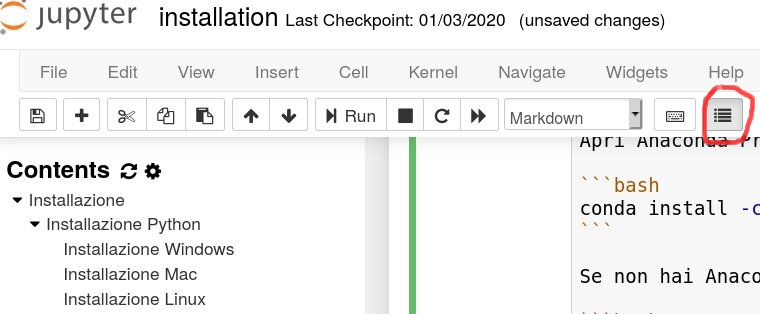
Once installed: To see table of contents in a document you will have to press a list button on the right side of the toolbar:
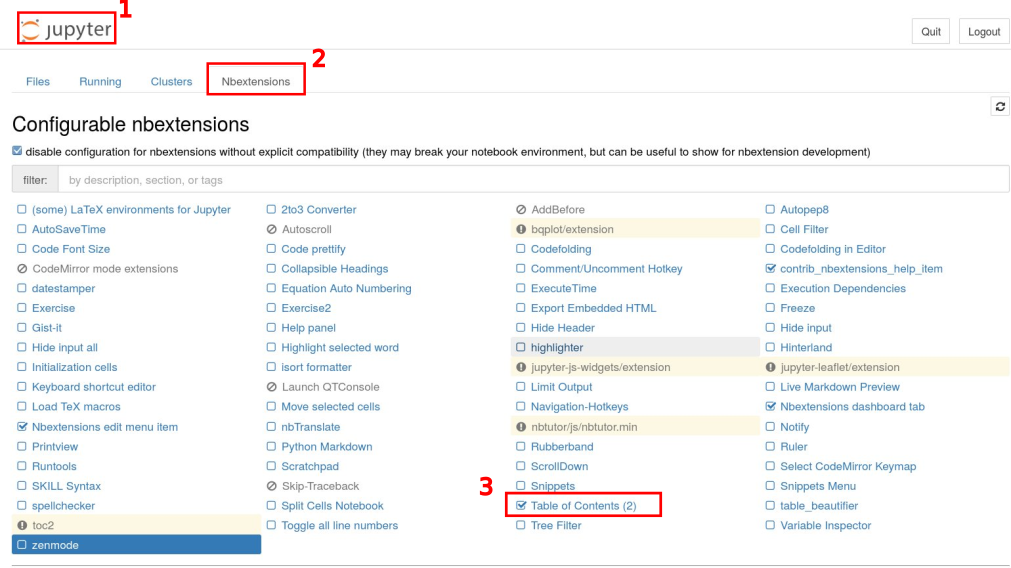
If by chance you don’t see the button:
go to main Jupyter interface
check
Nbextensionstabmake sure
Table of Contents(2)is enabledClose Jupyter, reopen it, go to a notebook, you should finally see the button
Installing Jupyter notebook - all operating systems
If you didn’t manage to find and/or start Jupyter, probably it means we need to install it!
You may try installing Jupyter with pip (the native package manager of Python)
To install, run this command:
python3 -m pip install --user jupyter -U
Once installed, follow the section
Una volta installato, segui la sezione Run Jupyter Notebook
ATTENTION: you DON’T need to install Jupyter inside virtual environments You can consider Jupyter as a system-level application, which should be independent from virtual environments. If you are inside a virtual environment (i.e. the command line begins with a writing in parenthesis like (myprj)``), exit the environment by typeing``deactivate`)
HELP: if you have trouble installing Jupyter, while waiting for help you can always try the online demo version (note: it’s not always available) or Google Colab
Projects with virtual environments
WARNING: If these are your first steps with Python, you can skip this section.
You should read it if you have already done personal projects with Python that you want to avoid compromising, or when you want to make a project to ship to somebody.
When we start a new project with Python, we usually notice quickly that we need to extend Python with particular libraries, like for example to draw charts. Not only that, we might also want to install Python programs which are not written by us and they might as well need their peculiar libraries to work.
Now, we could install all these extra libraries in a unique cauldron for the whole computer, but each project may require its specific versions of each library, and sometimes it might not like versions already installed by other projects. Even worse, it might automatically update packages used by old projects, preventing old code from working anymore. So it is PRACTICALLY NECESSARY to separate well each project and its dependencies from those of other projects: for this purpose you can create a so-called virtual environment .
Creating virtual environments
If you installed Anaconda, to create virtual environments you can use its package manager
conda. Supposing we want to call our projectmyprj(but it could be any name), to put into a folder with the same namemyprj, we can use this command to create a virtual environment:conda create -n myprj
The command might require you to download packages, you can safely confirm.
If you *don’t have* Anaconda installed, to create virtual environments it’s best to use the native Python module
venv:python3 -m venv myprj
Both methods create the folder myprj and fill it with all required Python files to have a project completely isolated from the rest of the computer. But now, how can we tell Python we want to work right with that project? We must activate the environment as follows.
Activate a virtual environment
To activate the virtual environment, we must use different commands according to our operating system (but always from the terminal)
Activate environment in Windows with Anaconda:
activate myprj
Linux & Mac (without Anaconda):
source myprj/bin/activate
Once the environment is active, in the command prompt we should see the name of that environment (in this case myprj) between round parenthesis at the beginning of the row:
(myprj) some/current/folder >
The prefix lets us know that the environment myprj is currently active, so Python comands we will use all use the settings and libraries of that environment.
Note: inside the virtual environment, we can use the command python instead of python3 and pip instead of pip3
Deactivate an environment:
Write in the console the command deactivate. Once the environment is deactivated, the environment name (myprj) at the beginning of the prompt should disappear.
Executing environments inside Jupyter
As we said before, Jupyter is a system-level application, so there should be one and only one Jupyter. Nevertheless, during Jupyter execution, we might want to execute our Python commands in a particular Python environment. To do so, we must configure Jupyter so to use the desired environment. In Jupyter terminology, the configurations are called kernel: they define the programs launched by Jupyter (be they Python versions or also other languages like R). The current kernel for a notebook is visibile in the right-upper corner. To select a desired kernel, there are several ways:
With Anaconda
Jupyter should be available in the Navigator. If in the Navigator you enable an environment (like for example Python 3), when you then launch Jupyter and create a notebook you should have the desired environment active, or at least be able to select a kernel with that environment.
Without Anaconda
In this case, the procedure is a little more complex:
— 1 From the terminal þactivate your environment](#Activate-a-virtual-environment)
— 2 Create a Jupyter kernel:
python3 -m ipykernel install --user --name myprj
NOTE: here myprj is the name of the Jupter kernel. We use the same name of the environment only for practical reasons.
— 3 Deactivate your environment, by launching
deactivate
From now on, every time you run Jupyter, if everything went well under the Kernel menu in the notebook you should be able to select the kernel just created (in this example, it should have the name myprj)
NOTE: the passage to create the kernel must be done only once per project
NOTE: you don’t need to activate the environment before running Jupyter!
During the execution of Jupyter simply select the desired kernel. Nevertheless, it is convenient to execute Jupyter from the folder of our virtual environment, so we will see all the project files in the Jupyter home.
Further readings
Go on with the page Tools and scripts to learn how to use other editors and Python architecture.