Galactic love
Download worked project
The company Astro Logic provides horoscopes to thousands of loyal customers, who each day require a number of divinitions. The most requested is whether or not they should engage in love affairs with a potential partner, who is chosen according to rigourous criteria like his/her astrological sign. You are then hired to devise a fancy visualization which given two astrological signs and their love compatibility, displays the constellations of their signs close when the the compatibility is high and far away when compatibility is low.
Astrology has been dated to at least the 2nd millennium BCE, and has its roots in calendrical systems used to predict seasonal shifts and to interpret celestial cycles as signs of divine communications. Even if considered a pseudo-science by today standards, it can still provide us with some light-hearted fun while we develop fancy visualizations and matrix manipulations.
What to do
Unzip exercises zip in a folder, you should obtain something like this:
galactic-love-prj
    galactic-love.ipynb
    galactic-love-sol.ipynb
    stars.csv
    zodiac.csv
    jupman.py
WARNING: to correctly visualize the notebook, it MUST be in an unzipped folder !
open Jupyter Notebook from that folder. Two things should open, first a console and then a browser. The browser should show a file list: navigate the list and open the notebook
galactic-love.ipynbGo on reading the notebook, and write in the appropriate cells when asked
Shortcut keys:
to execute Python code inside a Jupyter cell, press
Control + Enterto execute Python code inside a Jupyter cell AND select next cell, press
Shift + Enterto execute Python code inside a Jupyter cell AND a create a new cell aftwerwards, press
Alt + EnterIf the notebooks look stuck, try to select
Kernel -> Restart
parse_stars
Let’s start with real astronomical data. You are given a database of constellations called stars.csv (we slightly tweaked it for this occasion - original data source: Space Telescope Science Institute)
[1]:
import pandas as pd

stars_df = pd.read_csv('stars.csv', encoding='UTF-8')
stars_df[0:32]
[1]:
| constellation | type | ra | dec | description | |
|---|---|---|---|---|---|
| 0 | Andromeda | 0 | 3717 | 2539 | move gamma 1 |
| 1 | Andromeda | 1 | 2091 | 2137 | draw beta |
| 2 | Andromeda | 1 | 1179 | 1851 | draw delta |
| 3 | Andromeda | 1 | 251 | 1745 | draw alpha |
| 4 | Andromeda | 0 | 1716 | 1405 | move eta |
| 5 | Andromeda | 1 | 1420 | 1456 | draw zeta |
| 6 | Andromeda | 1 | 1156 | 1758 | draw epsilon |
| 7 | Andromeda | 1 | 1179 | 1851 | draw delta |
| 8 | Andromeda | 1 | 1106 | 2023 | draw pi |
| 9 | Andromeda | 1 | 512 | 2320 | draw theta |
| 10 | Andromeda | 1 | 42544 | 2596 | draw iota |
| 11 | Andromeda | 1 | 42612 | 2660 | draw kappa |
| 12 | Andromeda | 1 | 42526 | 2787 | draw lambda |
| 13 | Andromeda | 0 | 42544 | 2596 | move iota |
| 14 | Andromeda | 1 | 41457 | 2539 | draw omicron |
| 15 | Andromeda | 0 | 1106 | 2023 | move pi |
| 16 | Andromeda | 1 | 2091 | 2137 | draw beta |
| 17 | Andromeda | 1 | 1702 | 2309 | draw mu |
| 18 | Andromeda | 1 | 1494 | 2464 | draw nu |
| 19 | Andromeda | 1 | 2085 | 2834 | draw phi |
| 20 | Andromeda | 1 | 2939 | 2917 | draw 51 |
| 21 | Andromeda | -1 | 0 | 0 | NaN |
| 22 | Antlia | 0 | 17077 | -2157 | move epsilon |
| 23 | Antlia | 2 | 18814 | -1864 | dotted alpha |
| 24 | Antlia | 2 | 19701 | -2228 | dotted iota |
| 25 | Antlia | -1 | 0 | 0 | NaN |
| 26 | Apus | 0 | 26635 | -4742 | move alpha |
| 27 | Apus | 2 | 29803 | -4733 | dotted gamma |
| 28 | Apus | 2 | 30092 | -4651 | dotted beta |
| 29 | Apus | 2 | 29410 | -4721 | dotted delta 1 |
| 30 | Apus | 2 | 29803 | -4733 | dotted gamma |
| 31 | Apus | -1 | 0 | 0 | NaN |
You will have to parse it so to obtain a dictionary which maps each constellation to its stars, expressed as a list of lists of points type and coordinates.
Since later we will need to show points in a 2d chart, you will have to transform the coordinates obtained from the data (right ascension and declination in degrees) as follows:
\(\large x = \frac{15}{1800}ra\)
\(\large y = \frac{dec}{60}\)
You can find the complete output in expected_stars_db.py
Excerpt:
{'Andromeda': [
                  [0, 30.974999999999998, 42.31666666666666],
                  [1, 17.425, 35.61666666666667],
                  [1, 9.825000000000001, 30.849999999999998],
                  [1, 2.091666666666667, 29.083333333333332],
                  [0, 14.3, 23.416666666666668],
                  [1, 11.833333333333332, 24.266666666666666],
                  [1, 9.633333333333333, 29.3],
                  [1, 9.825000000000001, 30.849999999999998],
                  [1, 9.216666666666667, 33.71666666666667],
                  [1, 4.266666666666667, 38.666666666666664],
                  [1, 354.5333333333333, 43.266666666666666],
                  [1, 355.09999999999997, 44.333333333333336],
                  [1, 354.3833333333333, 46.45],
                  [0, 354.5333333333333, 43.266666666666666],
                  [1, 345.475, 42.31666666666666],
                  [0, 9.216666666666667, 33.71666666666667],
                  [1, 17.425, 35.61666666666667],
                  [1, 14.183333333333334, 38.483333333333334],
                  [1, 12.45, 41.06666666666666],
                  [1, 17.375, 47.233333333333334],
                  [1, 24.491666666666667, 48.61666666666667],
                  [-1, 0.0, 0.0]
               ],
 'Antlia':   [
                  [0, 142.30833333333334, -35.95],
                  [2, 156.78333333333333, -31.066666666666666],
                  [2, 164.175, -37.13333333333333],
                  [-1, 0.0, 0.0]
             ],
  .
  .
  .
}
[2]:
import csv

def parse_stars(filename):
    raise Exception('TODO IMPLEMENT ME !')

stars_db = parse_stars('stars.csv')

stars_db['Antlia']
#stars_db['Andromeda']
plot_stars 1
Write a function plot_stars to plot constellations.
WARNING: DO NOT use GraphViz!
Even if we are making plots which look like networks, for these visualizations you just need basic matplotlib (and some creativity ;-)
WARNING: for now, ignore the new_center parameter
A point type can either be:
0: start a new line not connected with the previous one1: connect previous point with a straight segment2: connect previous point with a dotted segment (draw it withlinestyle=':'parameter)-1: last point, ignore
Available colorschemes are 'M', 'F', or 'R' (red)
to set a black background, set
plt.rcParams['axes.facecolor'] = 'black'draw stars as white dots, setting
markersize=6to get a nice glowing effect for the lines, draw twice: once with a thick line and dark color, and once with a thin line with a bright color. You can find the colors in
color_schemes. To set them inplt.plotcall, uselinewidth(sets width in pixels) andcolorparameter, notecolortakes a single parameter
Examples:
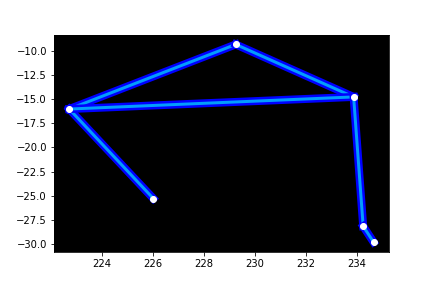
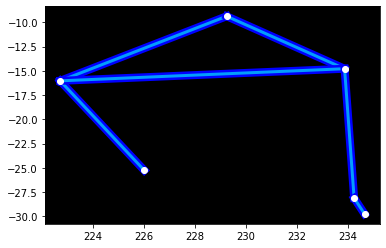
>>> stars_db['Libra']
[[0, 226.01666666666665, -25.266666666666666],
 [1, 222.71666666666667, -16.03333333333333],
 [1, 229.25, -9.366666666666667],
 [1, 233.875, -14.783333333333333],
 [1, 222.71666666666667, -16.03333333333333],
 [0, 233.875, -14.783333333333333],
 [1, 234.25, -28.133333333333333],
 [1, 234.65833333333333, -29.766666666666666],
 [-1, 0.0, 0.0]]

>>> plot_stars('Libra', 'M', stars_db)
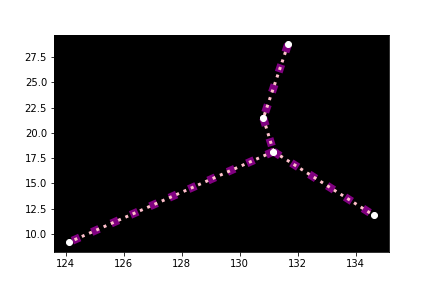
>>> stars_db['Cancer']   # has type-2  dotted points
[[0, 131.66666666666669, 28.75],
 [2, 130.8166666666667, 21.466666666666665],
 [2, 131.16666666666666, 18.15],
 [2, 134.61666666666667, 11.85],
 [0, 131.16666666666666, 18.15],
 [2, 124.125, 9.183333333333334],
 [-1, 0.0, 0.0]]

>>> plot_stars("Cancer", 'F', stars_db)
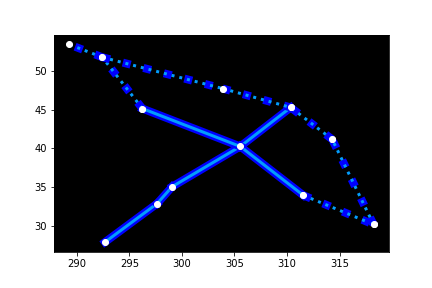
>>> plot_stars("Cygnus", 'M', stars_db) # mixed segment types
[3]:
%matplotlib inline

import numpy as np
import matplotlib.pyplot as plt

color_schemes = {
    'M': ('blue', '#039dfc'),
    'F': ('purple', 'pink'),
    'R': ('darkred', 'red')
}

def plot_stars(constellation_name, color_scheme, stars, new_center=None):
    raise Exception('TODO IMPLEMENT ME !')

from pprint import pprint
pprint(stars_db['Libra'])
plot_stars('Libra', 'M', stars_db)
[4]:
pprint(stars_db['Cancer'])   # has type-2  dotted points
plot_stars("Cancer", 'F', stars_db)
[5]:
plot_stars("Cygnus", 'M', stars_db) # mixed segment types
plot_stars 2 - new_center
Change the previous function plot_stars so it accepts a new argument new_center, which is either None or a tuple of coordinates where the constellation should be centered:
be precise in determining the boundaries of the constellation
DO NOT assume the constallation has a fixed width nor height (so no constants in code!)
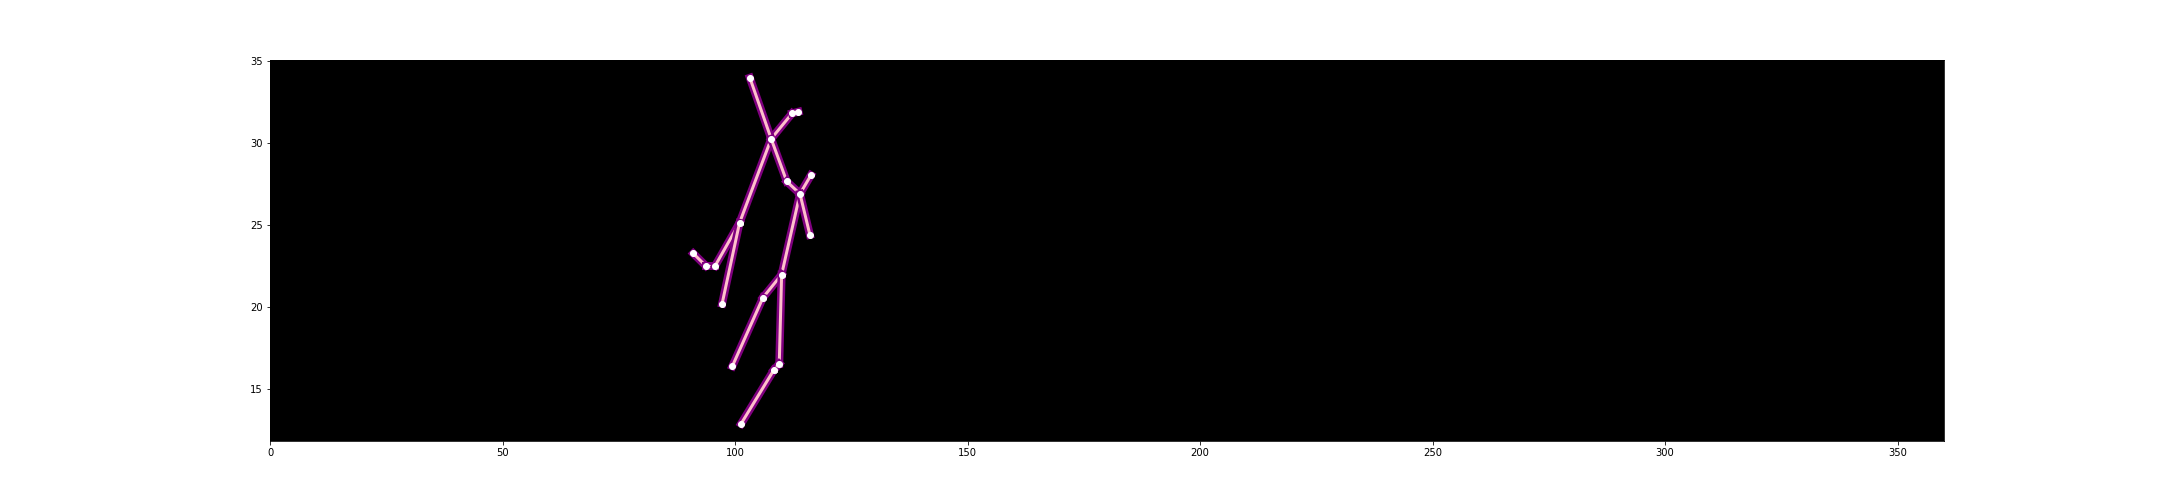
Example 1:
fig = plt.figure(figsize=(30,7))
plt.xlim(0,360)
plt.ylim(-40,40)
plot_stars('Gemini', 'F',stars_db, new_center=None)  # no translation
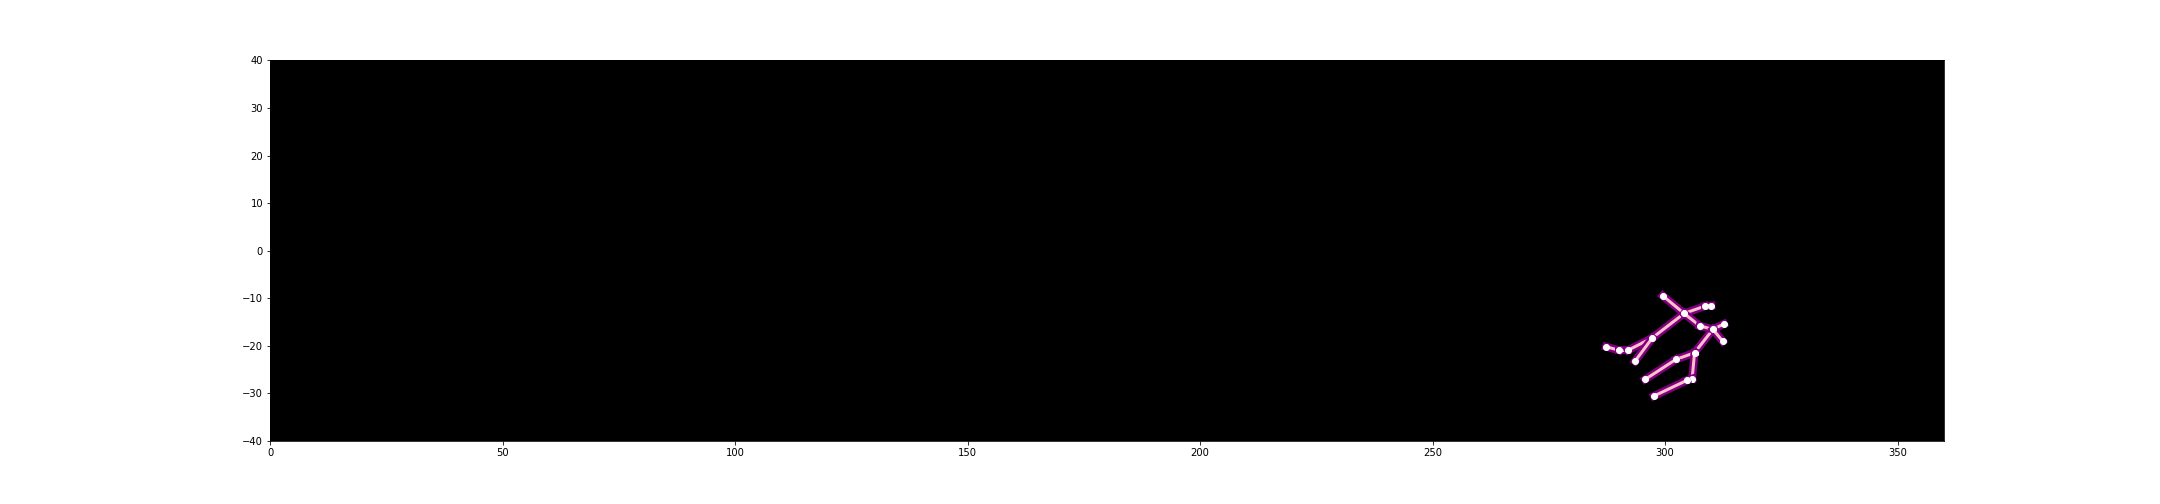
Example 2:
fig = plt.figure(figsize=(30,7))
plt.xlim(0,360)
plt.ylim(-40,40)
plot_stars('Gemini', 'F',stars_db, new_center=(300, -20))  # centered in 300, -20
parse_zodiac
You are given a file zodiac.csv. For each sign, the table contains astrological information and affinity with other signs, expressed as a relation matrix:
[8]:
import pandas as pd
df = pd.read_csv('zodiac.csv', encoding='UTF-8')
df[:4]
[8]:
| Constellation | House | Glyph | Symbol | Dates | Element | Quality | Ruling Planet | Day/Night | Aries | ... | Gemini | Cancer | Leo | Virgo | Libra | Scorpius | Sagittarius | Capricornus | Aquarius | Pisces | |
|---|---|---|---|---|---|---|---|---|---|---|---|---|---|---|---|---|---|---|---|---|---|
| 0 | Aries | 1 | ♈︎ | Ram | 21 March\n-\n20 April | Fire | Cardinal | Mars | Day | NaN | ... | 4.0 | NaN | 5.0 | NaN | NaN | NaN | 5.0 | NaN | 4.0 | NaN |
| 1 | Taurus | 2 | ♉︎ | Bull | 21 April\n-\n21 May | Earth | Fixed | Venus | Night | NaN | ... | NaN | 4.0 | NaN | 5.0 | NaN | NaN | NaN | 5.0 | NaN | 4.0 |
| 2 | Gemini | 3 | ♊︎ | Twins | 22 May\n-\n21 June | Air | Mutable | Mercury | Day | 4.0 | ... | NaN | NaN | 4.0 | NaN | 5.0 | NaN | NaN | NaN | 5.0 | NaN |
| 3 | Cancer | 4 | ♋︎ | Crab | 22 June\n-\n21 July | Water | Cardinal | Moon | Night | NaN | ... | NaN | NaN | NaN | 4.0 | NaN | 5.0 | NaN | NaN | NaN | 5.0 |
4 rows × 21 columns
Parse the table so to get a a dictionary of dictionaries, with some selected data:
affinities are in the scale 1-5, normalize them to floats 0.0-1.0
dates contain
\n, normalize them so to have dates separated by a dash as in21 March-20 April
NOTE: To parse the file, a csv.reader is sufficient, it’s not necessary to use pandas - even if data seem to span multiple lines because of the \n in dates, note they are bounded by " so rows will be correctly parsed by csv.reader
You can find the complete output in expected_zodiac_db.py
{
 'Aquarius': {
              'affinities': {
                              'Aries': 0.8,
                              'Gemini': 1.0,
                              'Libra': 1.0,
                              'Sagittarius': 0.8
                             },
              'dates': '21 January-18 February',
              'glyph': '♒︎',
              'house': 11
             },
 'Aries':    {
              'affinities': {
                              'Aquarius': 0.8,
                              'Gemini': 0.8,
                              'Leo': 1.0,
                              'Sagittarius': 1.0
                            },
              'dates': '21 March-20 April',
              'glyph': '♈︎',
              'house': 1
             },
  .
  .
  .
}
[9]:
import csv

def parse_zodiac(filename):
    raise Exception('TODO IMPLEMENT ME !')

zodiac_db = parse_zodiac('zodiac.csv')


from pprint import pprint
#pprint(zodiac_db, width=100)
assert zodiac_db['Aries']['dates'] == '21 March-20 April'
assert zodiac_db['Aries']['affinities'] == {'Aquarius': 0.8, 'Gemini': 0.8, 'Leo': 1.0, 'Sagittarius': 1.0}
assert zodiac_db['Aries']['glyph'] == '♈︎'
assert zodiac_db['Aries']['house'] == 1
assert zodiac_db['Gemini']['dates'] == '22 May-21 June'
assert zodiac_db['Gemini']['affinities'] == {'Aquarius': 1.0, 'Aries': 0.8, 'Leo': 0.8, 'Libra': 1.0}
assert zodiac_db['Gemini']['glyph'] == '♊︎'
assert zodiac_db['Gemini']['house'] == 3
from expected_zodiac_db import expected_zodiac_db
assert zodiac_db == expected_zodiac_db
plot_love
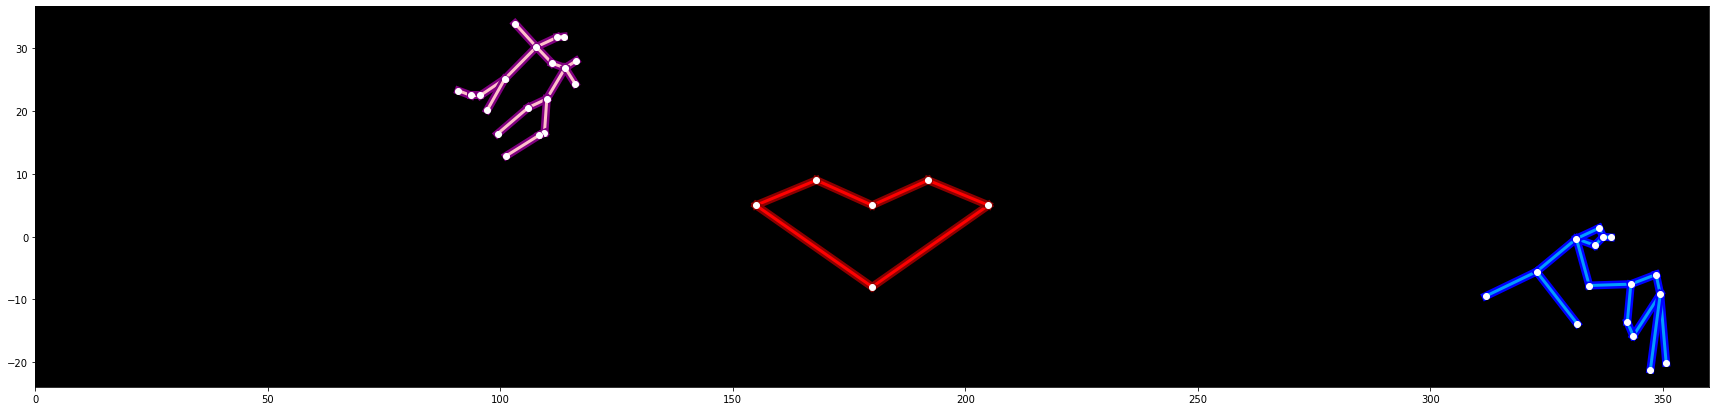
In stars.csv we inserted the special (fake!) constellation of 'Love': given the importance, we placed it at the center of the galaxy, positioned at x=180 degrees and y=0. If you try to plot it now, you should get something like this:
[10]:
# 'Aries',   'Taurus',   'Gemini',      'Cancer',      'Leo',      'Virgo',
# 'Libra',  'Scorpius',  'Sagittarius', 'Capricornus', 'Aquarius', 'Pisces'

fig = plt.figure(figsize=(30,7))
plt.xlim(0,360)
plot_stars('Gemini','F', stars_db)
plot_stars('Aquarius','M', stars_db)
plot_stars('Love','R', stars_db)    # fake!
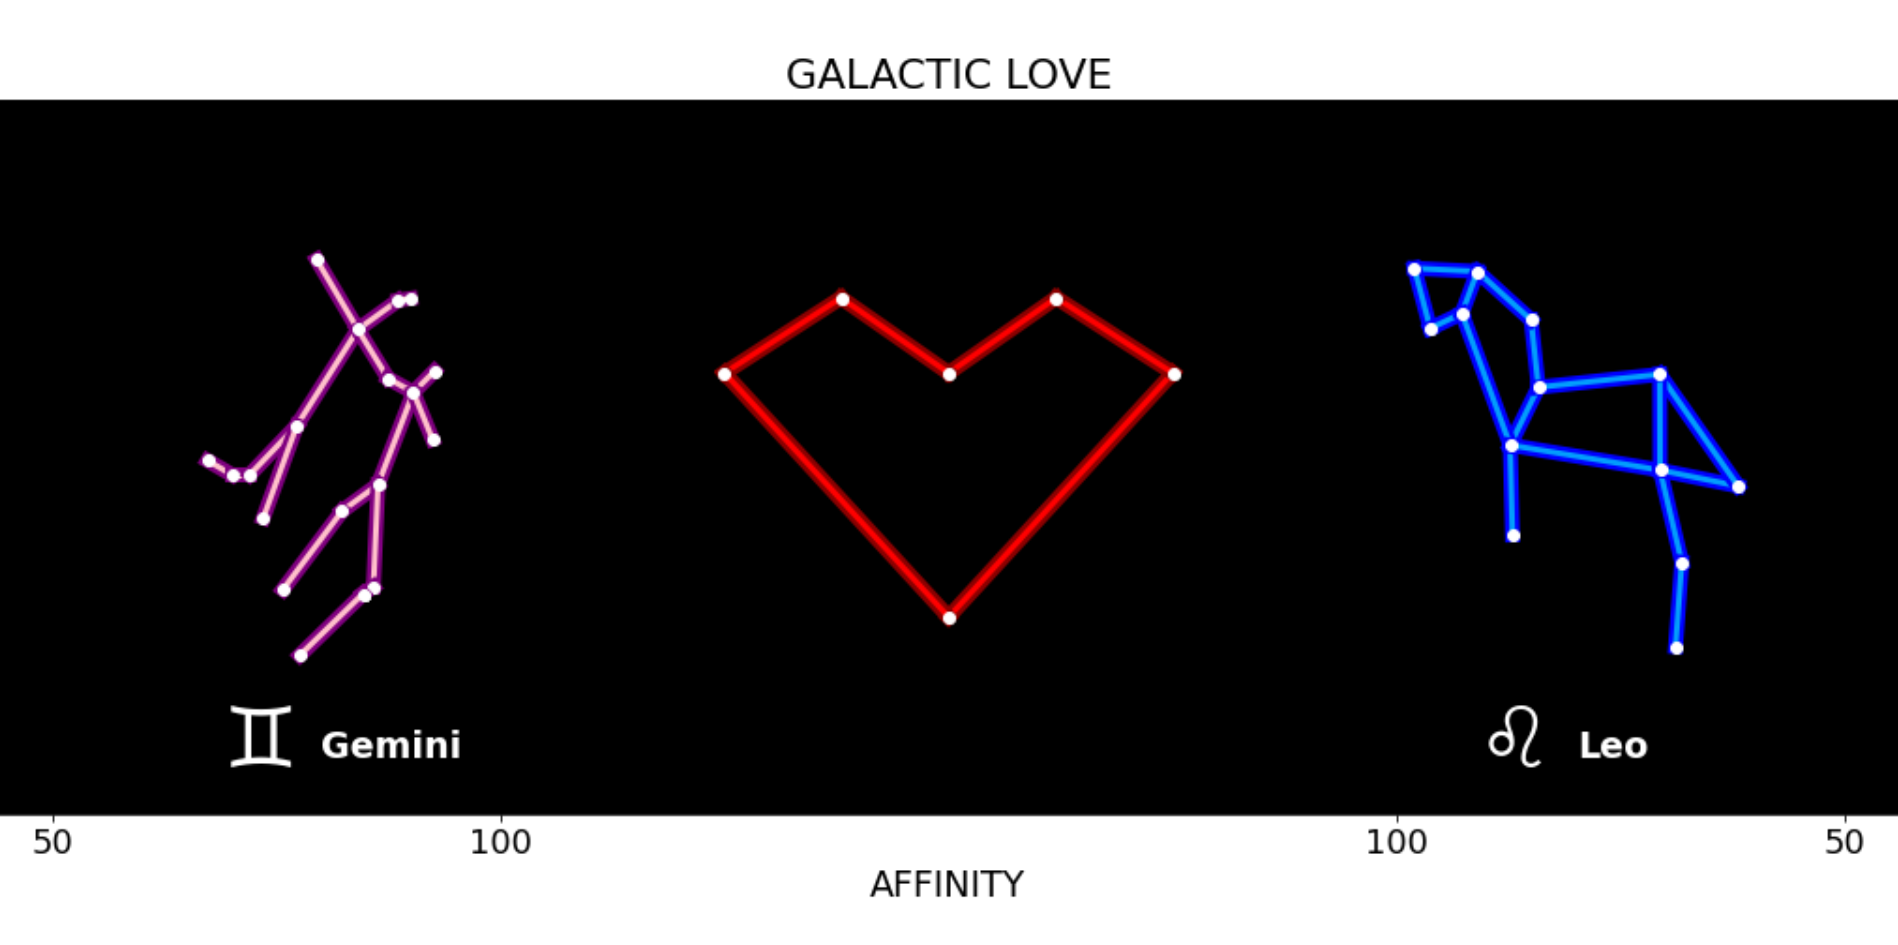
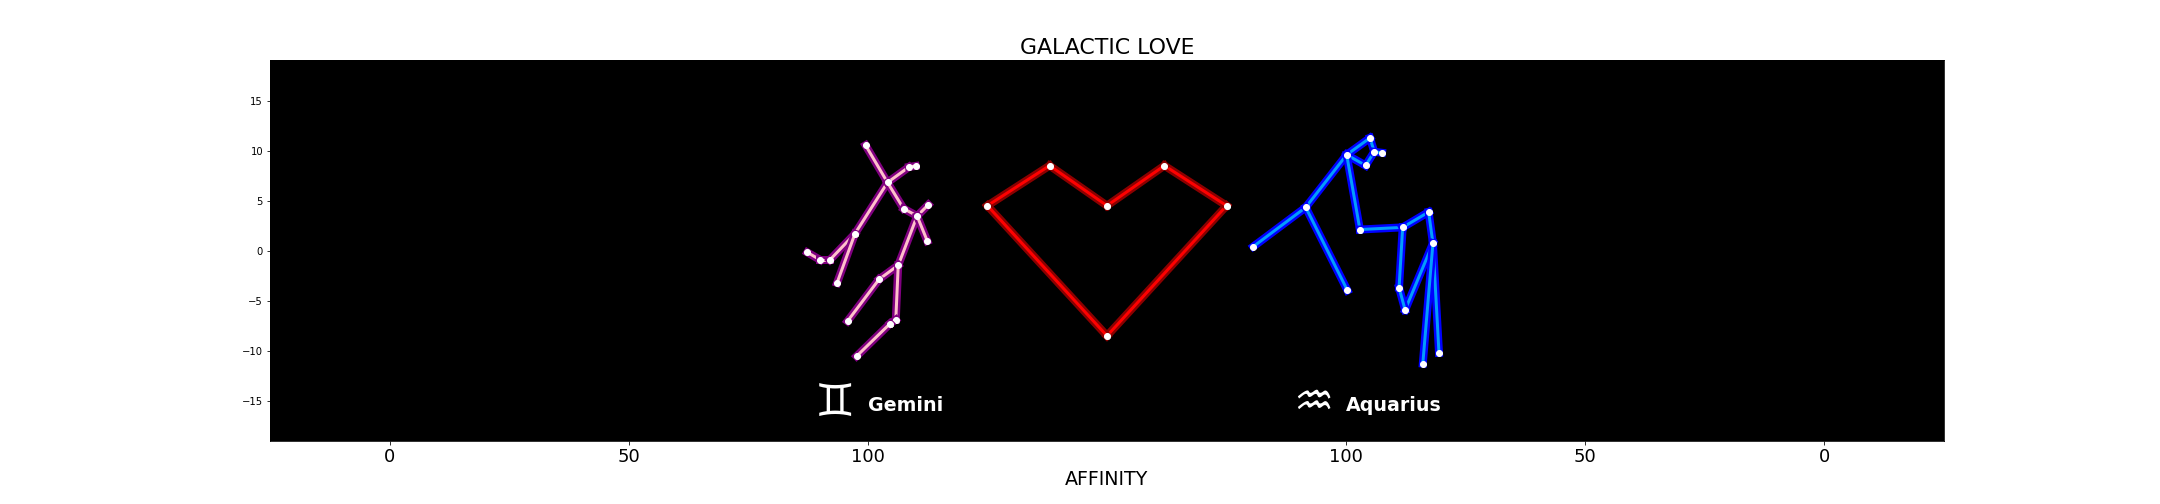
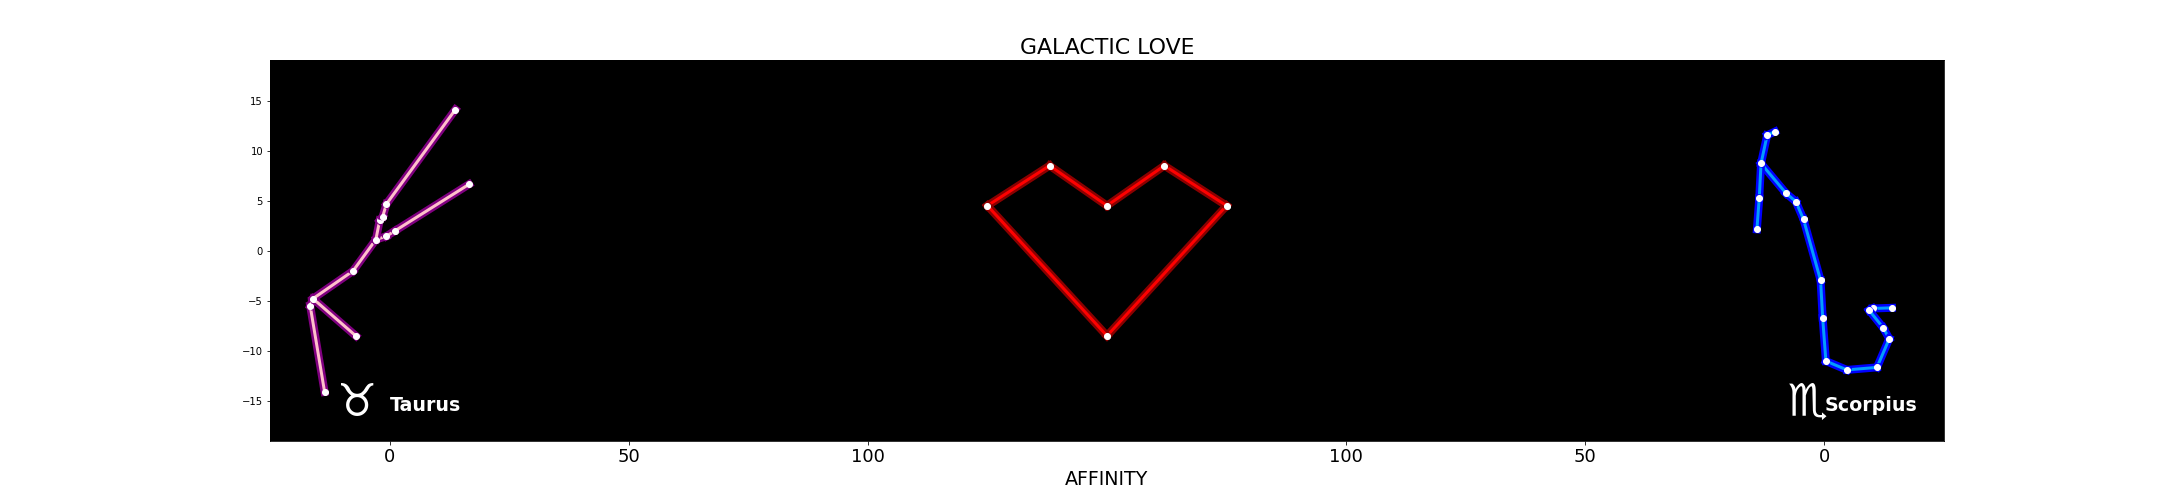
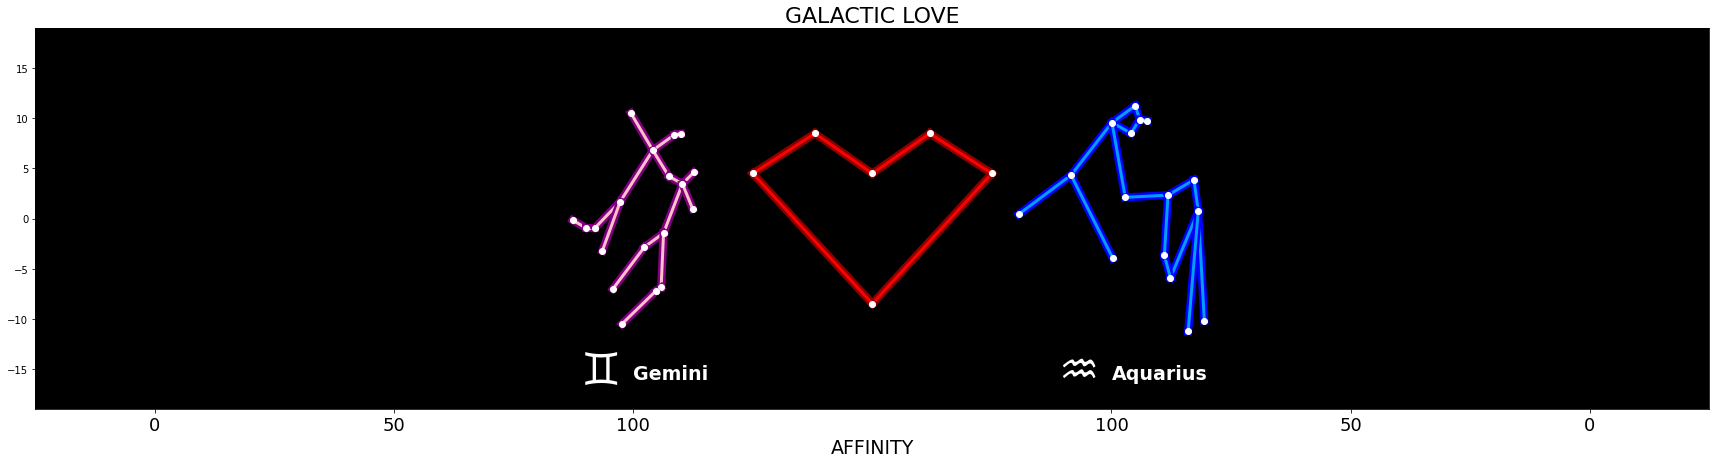
Given two astrological signs, place them on the same y=0 axis as the heart and make them symmetrically closer or farther from it according to their astrological affinity, also displaying their name and astrological glyph:
REMEMBER title and xlabels !
you can reuse previosly defined
plot_starsfunctionconstellations x centers should go from 50 to 150 degrees (and symmetrically, from -50 to -150)
BUT you will have to display reversed ticks: 100 50 0 for positive (and symmetrically 0 50 100 for negative)
For drawing text:
For increasing text size in
title,xticks,xlabel,textcalls, you can usefontsize=20parameter (for glyphs you will need a bigger number)for text inside the chart use use
plt.text(x,y,"some text")the glyph must be drawn bigger than the sign name, so you will need a separate call to
plt.text
Examples:
>>> plot_love('Gemini','Aquarius', stars_db, zodiac_db) # 1.0 affinity
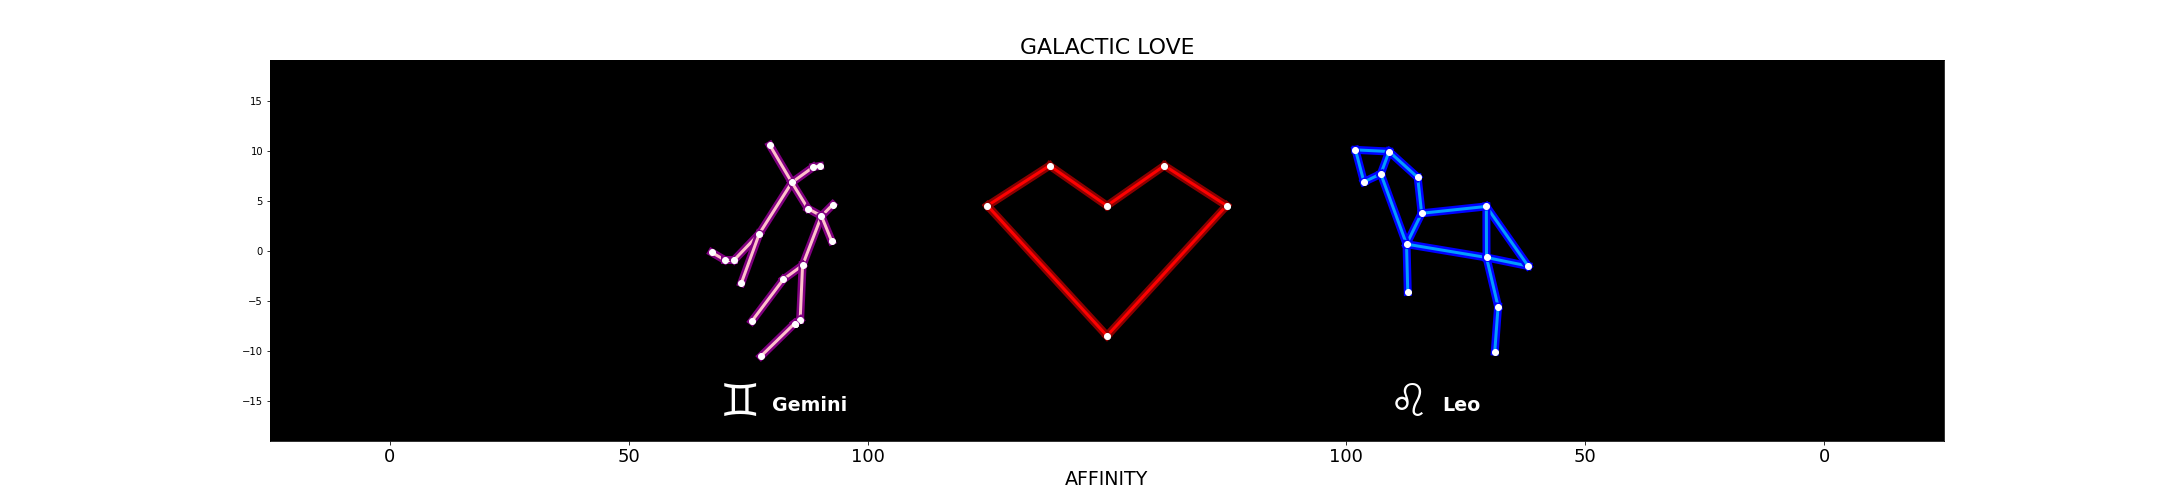
>>> plot_love('Gemini','Leo', stars_db, zodiac_db) # 0.8 affinity
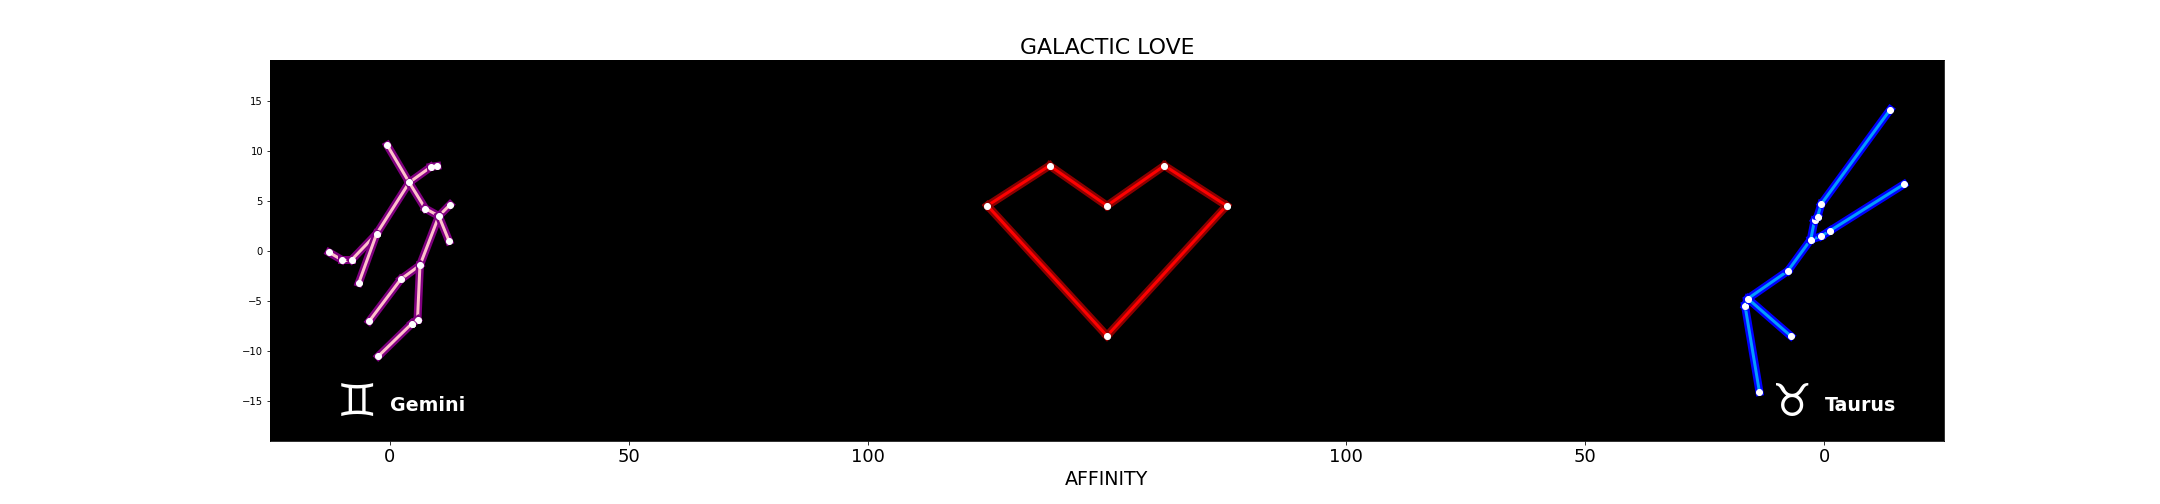
>>> plot_love('Gemini','Taurus', stars_db, zodiac_db) # 0.0 affinity
>>> plot_love('Taurus','Capricornus', stars_db, zodiac_db) # 1.0 affinity

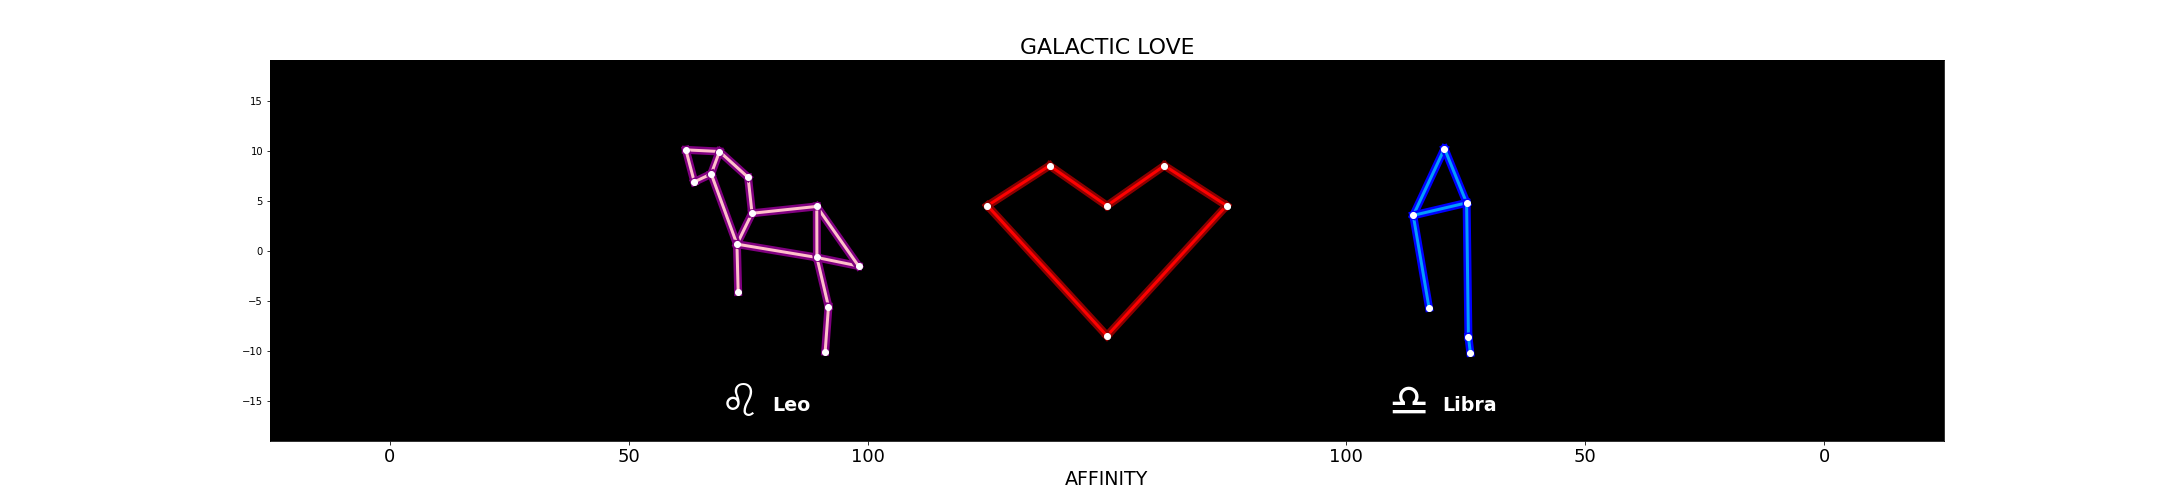
>>> plot_love('Leo','Libra', stars_db, zodiac_db) # 0.8 affinity
>>> plot_love('Taurus','Scorpius', stars_db, zodiac_db) # 0.0 affinity
[11]:
def plot_love(f_sign, m_sign, stars, zodiac):

    fig = plt.figure(figsize=(30,7))  # 30 inches large by 7 high
    plt.xlim(-175,175)

    raise Exception('TODO IMPLEMENT ME !')

plot_love('Gemini','Aquarius', stars_db, zodiac_db)  # 1.0 affinity
[12]:
plot_love('Gemini','Leo', stars_db, zodiac_db) # 0.8 affinity
[13]:
plot_love('Gemini','Taurus', stars_db, zodiac_db) # 0.0 affinity
[14]:
plot_love('Taurus','Capricornus', stars_db, zodiac_db) # 1.0 affinity
[15]:
plot_love('Leo','Libra', stars_db, zodiac_db) # 0.8 affinity
[16]:
plot_love('Taurus','Scorpius', stars_db, zodiac_db) # 0.0 affinity
[ ]: